
 okay sooo scurry i know but harsh critics are wanted and needed
and i wanted the ghost 2 be more like transparent on the right side but couldnt really figure that out soooo help?
pretty new at the digital painting thing so dont worry i wont get mad :)
Tuesday, June 30, 2009
SC ghost :) and scurry gurl

Monday, June 29, 2009
Naughty Melman !

this concept came to pretty randomly, of a guy named "Melman",
who is really obsessed with destroying lingerie,
:D
used just photoshop
Self portrait continued...
Here's a selfportrait I did a few months ago using ArtRage.
I had a reference photo.
Sunday, June 28, 2009
New and Improved Self Portrait


Saturday, June 27, 2009

Kevin Murphy SpeedPaint

Here's another speedpaint O'mine of another favorite comedian and writer of O'mine.
-Nick Fechter
http://nevilleandcompanycomics.blogspot.com/
Friday, June 26, 2009

Kelly

A lesson from school, painting skin. This took approx 5h
One of my first paint, painting a naked woman. I am not used to paint humans but this is a good exercise. I am painting right now an angel I will get finished next week.
One of my first paint, painting a naked woman. I am not used to paint humans but this is a good exercise. I am painting right now an angel I will get finished next week.

Thursday, June 25, 2009
The Dark Crystal


Preparing lineart in Photoshop
First off, I'm new here, so a quick hello to everyone. I originally emailed this little article to XT, and he liked it, so I'm posting it here for everyone. I hope you find this useful.
Bearing in mind, this is just my own personal method, and by no means the "be all, end all" but I think it's pretty straightforward, and gets a really solid result.
This method requires a couple of things. But we'll start simple.
Scan up your lineart in whatever method you choose, then bring into photoshop. (I personally scan my lineart at 600 dpi, grayscale mode, then "bump" it down to 300 dpi after I tweak it.)![]()
Once you have your lineart scanned in and level adjusted, hit Ctrl+J (Cmd+J on a Mac) to duplicate the layer. Change this layer's mode to Multiply. The purpose of this is to give your lineart a tad more weight. You can adjust the opacity of the multiply layer to your own liking.
Now, open up your channels palette. Note: This will work no matter the mode of your piece (Grayscale, RGB, CMYK). Drag the -main- channel (RGB/Gray/CMYK) into the load channel as selection icon (the dotted circle).
This will select everything that's white.
Hit Shift+Ctrl+I (Shift+Cmd+I on the Mac) to select inverse.
Now, create a new, empty layer above everything.
Grab your paintbucket, with low tolerance (I usually keep mine around 10-30, 10 for this step). Hit D to reset your default black to foreground color and fill. This will give you nice, crisp lines on a transparent layer.
From here you can lock transparency, and do color holds (colored lineart) with ease.
-Flatting Setup-
For flatting, I personally use the BPelt Multifill plug-in for Photoshop. Saves massive amounts of time. So, for this portion, you need the BPelt Multifill and Flatten Plug-ins.
(http://www.bpelt.com/psplugins/flatting.html)
Take the multiply layer from earlier, delete it.
Turn off the visibility of the new lineart layer (the transparent layer).
On the bottom layer (original scan lineart) threshold adjust (Image->Adjust->Threshold) to about 250 (This will vary depending on your lineart).
What this does, is it will make that layer -exactly- black and white. No graytones of any kind. It's not important to keep it overly crisp, because of what we're going to do next.
Once you've got it close to how you like. Go to the Filters menu, and scroll down to BPelt->Multifill. A menu box will appear. Most of this can be left default.
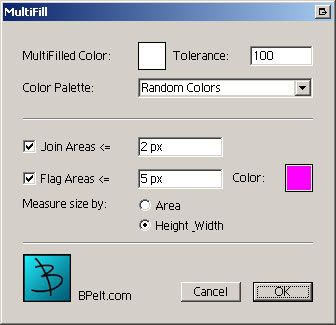
Click Ok.
You'll notice immediately that the whitespaces are now occupied by color, no 2 areas should be the same color (it helps if your lineart has fully closed lines, if not, you can fix it via wand later).
Now, in comics, one thing that nearly all professional colorists do is what's called "full trapping". What this is, is when the colors literally "touch" beneath the lineart. It keeps whitespace from showing up in mass print due to misaligns.
Trying to achieve full trapping by hand is a tedious process, but BPelt has a second filter that works right in with this. It's called Flatten.
Make sure the only visible layer is still our original lineart layer (the first scan). Filter->BPelt->Flatten. If everything was done by these steps. The black lines should disappear totally, and every color "patch" should now touch.
Turn the visibility back on to the transparent lineart layer. I use this to check for line closure sometimes.
Now you can create a Flats layer under your lineart, and use the wand to quickly, accurately select areas to flat, and your trapping will be solid as well!
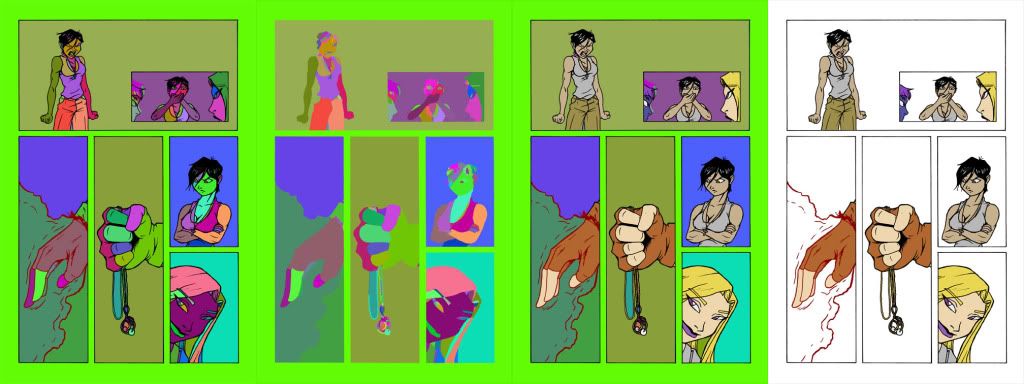
This is a visual outline of the above process.

- click for full view
I hope this aids even a few of you on your future projects. Learning this method shaved, literally, hours off my comic prep time.
Regards,
Keith W.
Tuesday, June 23, 2009

Fantastic Flying Four Process Pics
Hey all. First time post here. I'm reposting a step-by-step from my blog. Hopefully going to be used as part of the promotional material for a pretty big design contest. I'll post a link once I know for sure. Click for full-screen images.
Premise: The Fantastic Four as a World War II era stunt flight group. After the accident, Ben is now too heavy to drive the stunt planes. He's relegated to being the disgruntled mechanic while hot-headed Johnny gets all the action. Reed and Sue run the business together. Reed's got dreams of out-inventing his rival Howard Hughes while Sue is more concerned with scheduling air shows and that they're falling behind in their finances. This is Reed Richards' Fantastic Flying Four. Roughs. Throwing an initial composition together. Really rough. Blue pencil.

Pencils. Roughed them out on the same sheet and then did the individual characters to allow for some flexibility in the final comp.
Inked in Photoshop. Very quick. Not ideal, but it works for the cartooniness. Also recomposed a bit. Johnny stands alone. Applied flat color. This is mostly so I can use my Magic Wand to select different color fields.
This is actually two parts. First: I hit the left with shadow and the right with light. Second: I used the Lasso Tool to make a frisket. Hit that with the hard light and shadow.
Added texture to each part of clothing or skin. Used the Warp tool and some general frankensteining.
Pulled in a background. Blurred it. Then added some smoke to the ground at something like 50% opacity.
Added an old photograph type of look. 3 layers of the same parchment texture with different layer modes. Decided I hated Johnny's head. Put in real flame. Followed tutorial for some of it. Now I just hate Johnny.
That's it. Thanks for looking.
::drew
Monday, June 22, 2009
Girl Photoshop Sketch

I'm trying to study value and I still don't get it ....anyway, this picture is for Xia! I bought his faces constructed video set, and I went and did this:
Although....I have now forgotten how I did this! I am very upset now...
Peace!
Demon in Nest
Another quicky one I did in 20-30 minutes... no reference. I think that slowly I'm understanding Xia's tips and applying them. (Xia, keep rolling those video tutorials brother- they RULE!!)
Peace!
Female Warrior Concept
Female Warrior: I really enjoyed making this one... hope to have more to come. :)

Sunday, June 21, 2009

Devil Man SpeedPaint

Would you like to play a game of....LEAPFROG!? MWUHAHAHAHAHAHAHAHAHA!!!! >:D
-Nick Fechter
http://nevilleandcompanycomics.blogspot.com/
Saturday, June 20, 2009


Friday, June 19, 2009
Michael J. Nelson SpeedPaint

Here's a quick little number I did of a favorite comedian and writer of mine. Ughhh.... I HATE it when none of the art blogs I'm a member of don't have weekly themes or whatever that I can work on, doesn't leave me that inspired ಠ_ಠ
-Nick Fechter
http://nevilleandcompanycomics.blogspot.com/

Thursday, June 18, 2009


Wednesday, June 17, 2009
Master Painting Study - Guido Reni Christ Painting
I've been doing some study on an old master Guido Reni. I really got so inspired when I saw some of his paintings that I started a value study (like Xia suggests!). Hope you like it.
Here's a close view of the eyes since I had a problem with last time's portrait post.
This is the process for you guys:
Enjoy!
Subscribe to:
Posts (Atom)

Peace!
* We have reached the member cap of blogspot and haven't found any solution jet. If you know any, let us know. *
