First off, I'm new here, so a quick hello to everyone. I originally emailed this little article to XT, and he liked it, so I'm posting it here for everyone. I hope you find this useful.
Bearing in mind, this is just my own personal method, and by no means the "be all, end all" but I think it's pretty straightforward, and gets a really solid result.
This method requires a couple of things. But we'll start simple.
Scan up your lineart in whatever method you choose, then bring into photoshop. (I personally scan my lineart at 600 dpi, grayscale mode, then "bump" it down to 300 dpi after I tweak it.)![]()
Once you have your lineart scanned in and level adjusted, hit Ctrl+J (Cmd+J on a Mac) to duplicate the layer. Change this layer's mode to Multiply. The purpose of this is to give your lineart a tad more weight. You can adjust the opacity of the multiply layer to your own liking.
Now, open up your channels palette. Note: This will work no matter the mode of your piece (Grayscale, RGB, CMYK). Drag the -main- channel (RGB/Gray/CMYK) into the load channel as selection icon (the dotted circle).
This will select everything that's white.
Hit Shift+Ctrl+I (Shift+Cmd+I on the Mac) to select inverse.
Now, create a new, empty layer above everything.
Grab your paintbucket, with low tolerance (I usually keep mine around 10-30, 10 for this step). Hit D to reset your default black to foreground color and fill. This will give you nice, crisp lines on a transparent layer.
From here you can lock transparency, and do color holds (colored lineart) with ease.
-Flatting Setup-
For flatting, I personally use the BPelt Multifill plug-in for Photoshop. Saves massive amounts of time. So, for this portion, you need the BPelt Multifill and Flatten Plug-ins.
(http://www.bpelt.com/psplugins/flatting.html)
Take the multiply layer from earlier, delete it.
Turn off the visibility of the new lineart layer (the transparent layer).
On the bottom layer (original scan lineart) threshold adjust (Image->Adjust->Threshold) to about 250 (This will vary depending on your lineart).
What this does, is it will make that layer -exactly- black and white. No graytones of any kind. It's not important to keep it overly crisp, because of what we're going to do next.
Once you've got it close to how you like. Go to the Filters menu, and scroll down to BPelt->Multifill. A menu box will appear. Most of this can be left default.
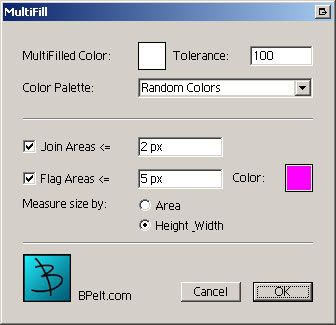
Click Ok.
You'll notice immediately that the whitespaces are now occupied by color, no 2 areas should be the same color (it helps if your lineart has fully closed lines, if not, you can fix it via wand later).
Now, in comics, one thing that nearly all professional colorists do is what's called "full trapping". What this is, is when the colors literally "touch" beneath the lineart. It keeps whitespace from showing up in mass print due to misaligns.
Trying to achieve full trapping by hand is a tedious process, but BPelt has a second filter that works right in with this. It's called Flatten.
Make sure the only visible layer is still our original lineart layer (the first scan). Filter->BPelt->Flatten. If everything was done by these steps. The black lines should disappear totally, and every color "patch" should now touch.
Turn the visibility back on to the transparent lineart layer. I use this to check for line closure sometimes.
Now you can create a Flats layer under your lineart, and use the wand to quickly, accurately select areas to flat, and your trapping will be solid as well!
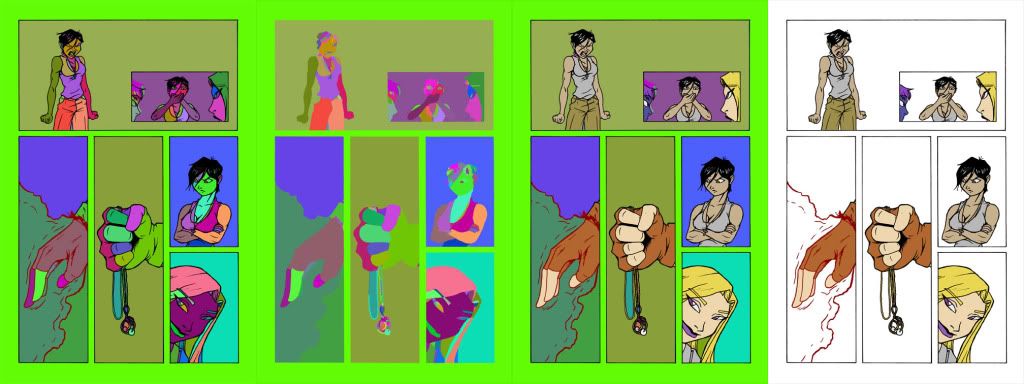
This is a visual outline of the above process.

- click for full view
I hope this aids even a few of you on your future projects. Learning this method shaved, literally, hours off my comic prep time.
Regards,
Keith W.


1 comment:
Thanks :)
Post a Comment